|
En nu verkennen ....
| 1. Basisbewegingen met je avatar |
 |
| Bewegen - wandelen - ronddraaien |
| Om te wandelen gebruik je de pijltjestoetsen. Blijf de pijltjestoets ingedrukt houden indien je wil blijven wandelen. Met de zijwaartse pijltjestoetsen ga je van richting veranderen en ga je ook ronddraaien indien je deze toets blijft indrukken. |
| Lopen |
| Hiermee kun je dubbel zo snel vooruitgaan : druk CTRL toets samen met de pijltjestoets |
| Doorheen objecten wandelen |
Om doorheen muren en andere objecten te kunnen lopen gebruik je de SHIFT-toets + de pijltjestoetsen. Dit is handig wanneer je vast komt te zitten met je avatar, zonder dat je moet gaan teleporteren naar een andere locatie. Het is niet in alle werelden mogelijk om doorheenobjecten te lopen. (Wereldinstellingen , bv. in een doolhof spel zal dit niet mogelijk zijn)
|
| Stijgen - dalen |
|
Om op ne neer te gaan met je avatar , moet je eveneens eerst klikken in de wereld (bv. op de grond ,dus vermijden dat je gaat typen in het chat-scherm) en daarna druk je op de + toets om te stijgen of op de - toets om te dalen . . Het is niet in alle werelden mogelijk om met je avatar te vliegen. (Wereldinstellingen)
|
|
Indien je een laptop hebt zonder numeriek klavier, dan moet je andere toetsen gebruiken om te vliegen, dan moet je de FN-toets intikken in combinatie met de P-toets of de ; toets.. Ofwel kun je uw eigen toetscombinatie gaan instellingen, hiervoor ga je in het menu naar : opties - configure controls.
|
|
| Rondvliegen |
|
Eerst zorg je ervoor dat je avatar naar boven gaat met de + toets. Dan druk je op de pijltjestoets "naar voor" ofwel druk je op één van de zijwaartse pijltjestoetsen en je zal rondvliegen, totdat je avatar terug op de grond terecht komt.
|
|
| Zijwaarts bewegen |
|
| De shift-toets in combinatie met de zijwaartse pijltjestoetsen doet je avatar opzij bewegen zonder dat deze gaat ronddraaien in een andere richting. De beweging is soms nuttig in spelletjes, om aanvallen te ontwijken. |
|
| jump |
|
| First activate the numeric keyboard with the NUMLOCK key , then press the 0 key of your numeric keyboard and you see yourself jumping !. for those who have a laptop without numeric keyboard: go to options -configure controls. The jump function is useful in some gaming worlds . |
|
| 2. Camerapositie wijzigen |
|
| Naar omhoog of omlaag kijken |
|
Let er eerst op , dat je in de scherm van de wereld klikt, want indien je het chat-scherm geselecteerd hebt, zal er niets gebeuren. Klik nu op de PAGE UP of PAGE DOWN toets, waarmee je avatar naar boven of naar beneden gaat kijken . Je kunt ook de ikoontjes op de toolbar gebruiken (deze verschijnen op de toolbar als je CTRL + F2 indrukt)
|
 |
| change camera view |
|
Met de END-toest kun je de camerapositie van je avatar wijzigen , er zijn 4 cameraposities en zie je de wereld vanuit een andere gezichtshoek, na de 4e klik op de END-toets kom je terug op de normale camerapositie terecht (first person). Met de * en de / kun je het zicht op je avatar dichter of verderbrengen. |
 |
| zoom in or zoom out |
|
| First press the END key, in order to have a view upon your avatar. Then you can use the * key or / key to zoom in or zoom out on your avatar, or you can also use the mouse wheel for this. |
|
| 3. Chatting |
|
| chat |
|
| Type CTRL+F4 to open or close the chat window.Type a text in the chat window box and type ENTER. You can resize the chat window by going to the chat window edges and then use the mouse to move the edges. If you have closed the chat window, reopen it with CTRL+F4. Or go to the menu and choose Show - Chat. |
|
| chat whisper |
|
You can also chat in whisper mode (chat with 1 person). Type F8 to open or close the whisper chat line. The whisper text will appear in blue. In some worlds it is not possible to whisper. |
|
| description chat |
|
| If you are typing /me before a phrase , then this will result in a description of what you are doing. Example : tourist1: /me is laughing --> in the chat window you will see : tourist1 is laughing ". This text will also appear in a different colour. |
|
| chat with bots |
|
| In some worlds there are bots. Bots are programmed, and will react on words which you typed in the chat or on actions which you are doing in the world.You can recognize a bot by a name between square brackets. It is also possible that someone is chatting via the bot itself. There also exist colorchat bots (in which you can choose your own chat colour), global chat bots (= chat in the entire world) ,phone bots (=chatting simultaneously from different worlds) , trivia game bots,...etc." |
|
| global chat |
|
In every world you can choose between 2 or more chat channels : local chat, global chat, etc. When you are in a world at a distance of more than 200 meter (20cells) from another visitor, then you will loose contact with that person : His/her name will also disappear in the chatbox. This chat contact problem can be solved by selecting global chat or by using a global chat bot : e.g. Hermesbot . |
|
| voice chat |
|
| When you are entering in a world with VOIP funciton, you can listen to an online conversation between citizens in that world. if you have a microphone , then you will be able to talk yourself too |
|
| 4. Avatar options |
|
| change your avatar |
|
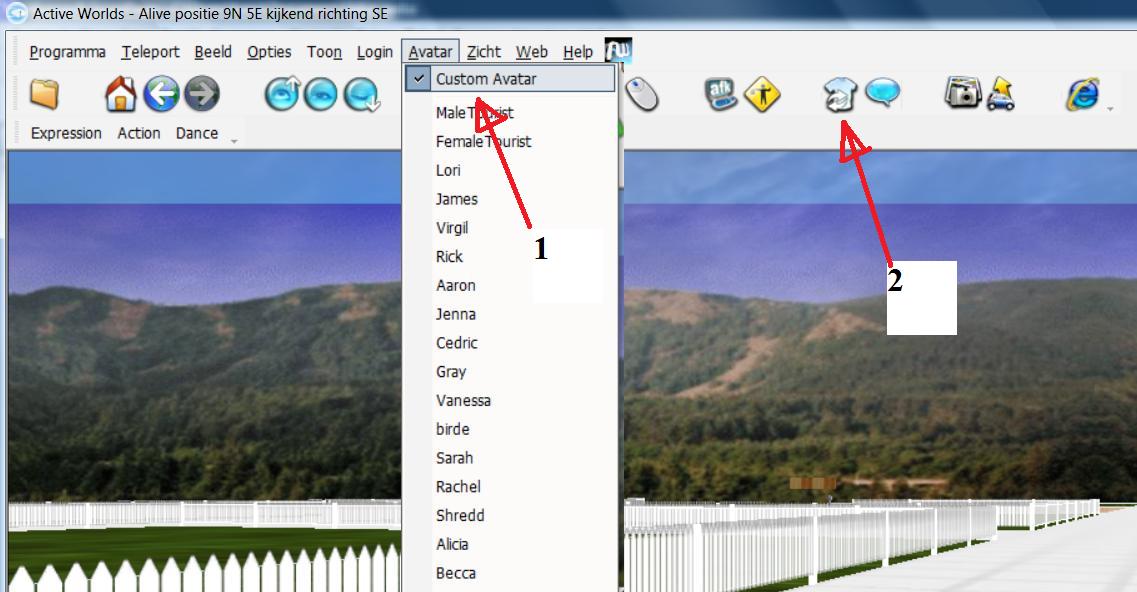
| In the menu bar can choose avatar, and then a list will appear : you can choose between a male or female avatar , and also a custom avatar (CAV).In every world the avatars are different, sometimes you have a wide range of avatars to choose from. |
|
| make gestures with your avatar |
|
| Typing CTRL+F3 will make appear or disappear the gestures bar , where you will find descriptions of gestures. Now click on one of the gestures and see your avatar move: spin around, wave, dance. If you desactivate in the menu : show - classic bars , then you will be able to do the gestures continuously. |
|
| gestures by clicking upon movers |
|
| There are also some objects called movers, these movers can have a gesture action, which will make you avatar make gestures when you click upon the object : e.g. when clicking upon a chair, the avatar will sit down ; also : dance gestures on a dancefloor. |
|
| make your own CAV or 'customizable avatar' |
|
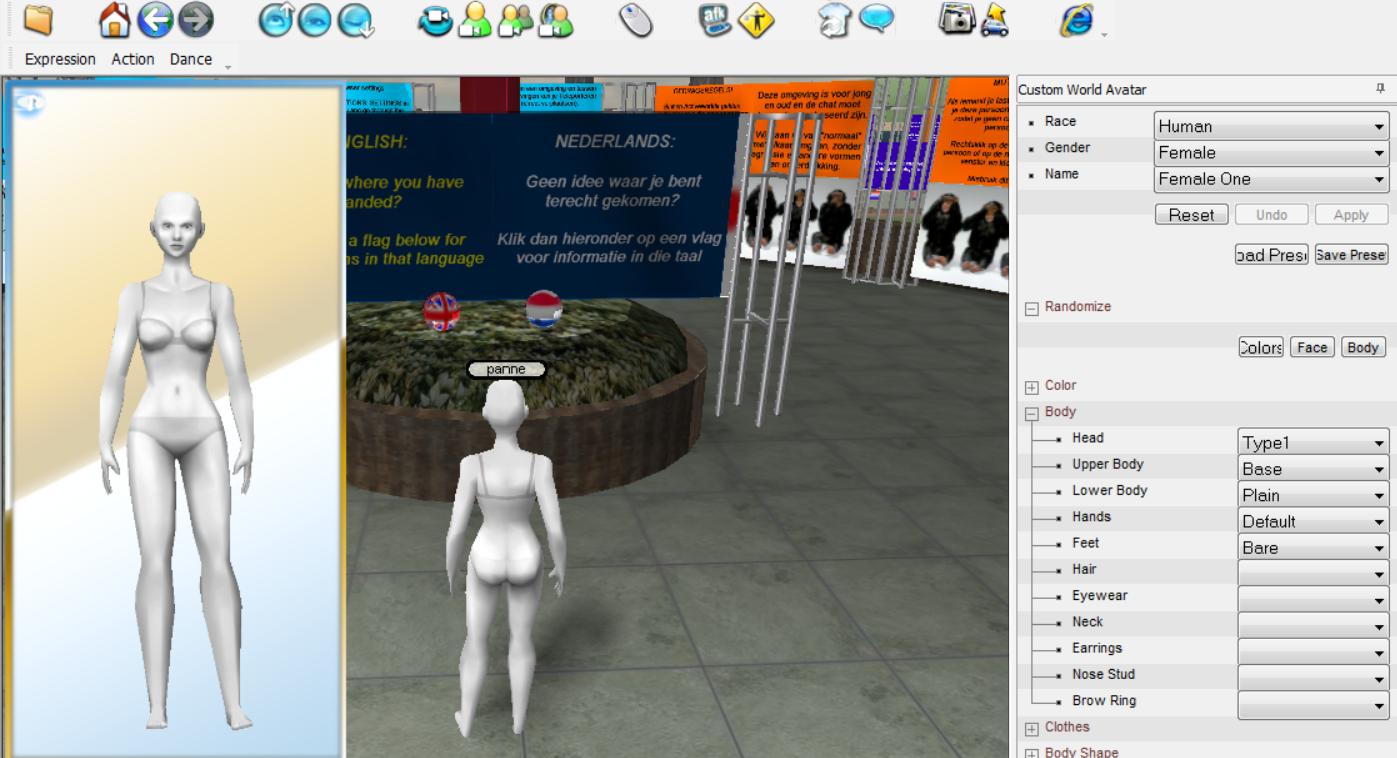
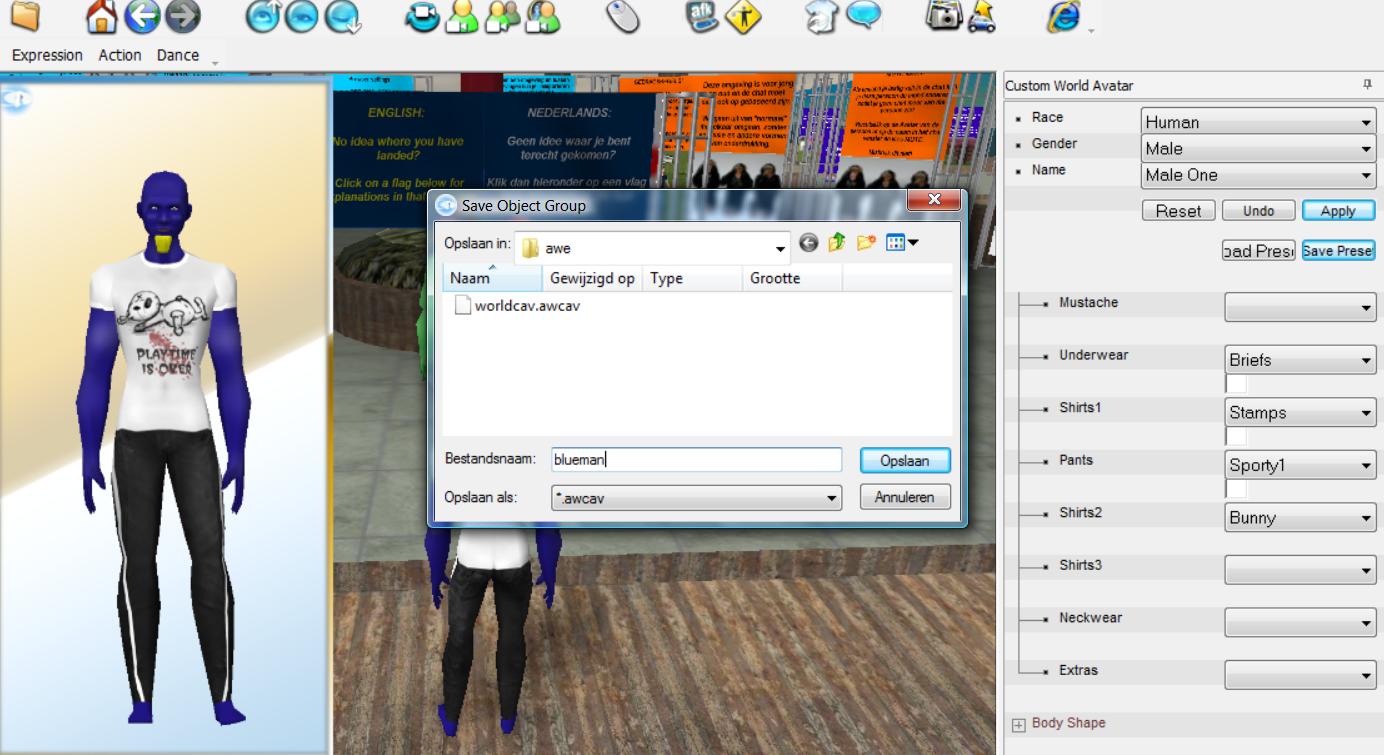
Go to the menu : avatar and choose custom avatar or click upon the t-shirt-icon in the toolbar or you can type CTRL + F6. Then you will have 2 screens: the right screen with the options, the left screen with the result. And you will see that your avatar changed into a naked grey avatar. Now you can start to choose the options in the right screen: hair color, clothes,skin, height ,etc. In the little squares , you can choose a colour. When you have finished making your avatar, you go at the top of the right screen : Save Preset , then you choose a filename and this avatar is saved on your computer. Then you click upon Apply, and you will see your own CAV in the world, instead of the naked grey avatar. When you return to Activeworlds, then you open again those screens with CTRL + F6 , and choose Load Preset. Here you will see again the filename of the CAV you had saved before, and you can select it and then choose Apply, so that you have the same avatar again. You can also make several avatars, each time you choose Save Preset and give each CAV a different filename. Then go again to Load Preset, where you see the list of all the CAVs that you have created. (click upon the pictures to enlarge:) |
|
|
|
| 5. Contact List |
|
| contact list |
|
| You can add other citizens to your contact list and see if they are online. Press F9 to see the tabs-screen and go to the tabsheet Contact, right-click and add a citizen. Or : right-click upon the avatar of another citizen and add as a contact person. Now you will know if they are online and in which world they are located. |
|
| telegrams |
|
| you can send those citizens a telegram message and you can receive messages from them as well. you can read those messages when you are in another world, or if you come online after being offline. |
|
| join and invite |
|
| you can invite other citizens to the world and position where you are now. And you can join other citizens or they can invite you . |
|
| 6. Teleporting |
|
| teleport and world access |
|
By using a teleport, you avatar enters directly in another world by using the tabs screen , press F9 to make this screen appear or disappear. Once you have the tabscreen, select the tabsheet Worlds. Here you see a list of the worlds with the number of visitors in it.Now double-click on name of the world of your choice. Worlds with a grey symbol are closed, but you might find people in those worlds: world owners and citizens helping to prepare the world for its grand opening, when the grey symbol changes into a coloured symbol.. (= world settings : Only the citizens with permission of the world owner can enter the world with a grey symbol). |
|
| local teleport |
|
| you can teleport to another world but also to another location in the same world.Go to the menu above the screen and choose "Teleport to: " and here you enter the world name. You can also add the location (coordinates) where you want be teleported , and you even add the height and direction in which you avatar looks. In some worlds it is not possible to do local teleports. However you may find objects or sign objects with teleport commands. Teleports can also be used on sign objects, announcing the teleport. Just like the teleport you have used to enter this building. |
|
| store teleports |
|
If you have found a beautiful location that you want to visit again, then go to the menu bar and choose : Teleport - Remember. You can add a description to this teleport location so that you know what you can see there. Now press F9 (tabscreen) and choose the tabsheet Teleports , where you will find your new teleport location.Double-click on the teleport description to teleport to that location.Note : these teleports are stored on your computer only, if you log in on another computer, then you won't see the teleports that you have saved. |
|
| warp |
|
| You may also find sign objects (or other objects) with warp commands. an object with a warp command makes the avatar slide to the other location instead of going directly to it. |
|
| 7. Media |
|
| read webpages |
|
If you press the F7 key in the world Venice-Venezia, then there will appear a website : venic3d.net . When you teleport to another world, than you will probably see another webpage when you press F7 : this depends on the world settings. Also the activate url-command can be used on any object, in order to view a webpage, mostly this is announced on a sign object or picture object. |
|
| listen to sounds and music |
|
Some objects contain action commands which create noises, sounds or music. Those sound files can be files of the world itself (where also the objects are stored) or they can be url links from webpages. you can hear midi files =(songs converted into beep tunes) or listen to links from music websites or internet radio stations. |
|
| user guide |
|
| in the menu , there is a user guide/help option, which you can also find in the F9-tabscreen : this is a list of the building commands and other useful information. If this information is insufficient you can still rely on other sources, like the awwiki pages and the awschool world... |
|
| 7. Language settings |
|
| the menu in your own language |
|
| For those speaking another native language than english : the menu can be changed into several languages.Go to the toolbar (above the screen) and choose : options - settings - advanced. Here you see : available message sets. Now select the word "default" and then you select one of the languages and finally confirm with ok. The list of languages in Activeworlds is different than the list of languages in the AW-Europe universe. Not all items in the menu are translated : the cav menu and the user guide remain in english. |
|
| 8. Other avatar related functions |
|
| enter in a zone or camera |
|
| When your avatar enters in a zone, you might enter in a darker or brighter space or hear suddenly music. When your avatar enters in a camera area , then you will see your avatar from a different camera position. |
|
| use movers |
|
We already told that movers can activate avatar gestures, if there is a sequence command added upon that mover. There are 3 types of movers : User controlled mover: when you click upon this object, you will be able to drive yourself with that mover: a car, bus, motorbike, boat, plane,.. Server controlled mover: when you click upon this object, the mover will guide you to a destination as created by the builder of this mover. Pickup item-mover: when you click upon this mover object, your avatar will pick up and wear or hold this mover : an apple, a sword, a gun, a hat, ... |
|
| 9. Building functions |
|
| building mode |
|
| In some worlds you can right-click upon objects (= object consultation) , which makes it possible to read the object names and the action commands. This is interesting for those who like to build, because these commands can be examples they can use as well. |
|
| start to build |
|
| Some worlds are building worlds, in which you have either a try-out zone, or your own building lot. In other large building worlds like Alphaworld, you can build on any cell which is not built (occupied) by another citizen. |
|
| copying |
|
| You start building your first object by copying another object : RIGHT-CLICK upon the object (the building mode window appears), then press the INSERT key (=copy), then move this copied object with the arrow keys to the unoccupied building zone, and you have created your first new object. |
|
| moving - rotating |
|
| Right-click upon your object to select the object ( the building mode window ) and press the ARROW KEYS to move the object. |
|
Rotate the object can be done by pressing : PAGEUP , PAGEDOWN, HOME , END , * and / keys |
|
| Select the object and copy this into a new object : INSERT , or delete the object : DELETE-key |
|
| precision building and multiple selection |
|
| Precision moves or rotations of the object can be done, by pressing also the SHIFT key or the CTRL key |
|
| If you press however first the SHIFT key or CTRL key, then you are making multiple object selections |
|
| This requires a bit of practise , in knowing the difference between precision building and multiple object selection |
|
| In the building mode window, you can also undo and reset the move or rotation |
|
| using models and action commands |
|
| Now you have started to build, you can learn using the models : there are object yards and object path lists where you can search for the appropriate models ( there are thousands of models in the standard object path) |
|
| And there are hundreds of action commands which can be applied on the model you have chosen In the world AWSchool and in the wiki pages , you can learn how to use them . Upon each model you can also choose one of the thousands of textures of the standard texture path. There are object and texture yard worlds, such as the world Uberpath, where you can choose the combination you want to use for your build. |
|
| 10. Function keys |
| F1 - User guide |
| Here you will find what you can do in the activeworlds universe . There is a list of building commands, chat settings, commands for modelling with rwx scripts, information about running a world on your own computer, links to the wiki pages, and other information. |
| F2 - Freelook mode |
| The chat is desactivated and your can look around with your avatar by moving around with your mouse, the mousewheel can be used to look up or look down. When pressing again F2 , then the freelook mode is finished again. |
| F3 - download-window : |
| This window gives you an overview of the files which are downloaded when entering a world. The objects which start to load in your world are stored into a seperate folders on you computer, which contains a long list of files, all of this we call the "cache". When you right-click upon that download-window, you can choose for "empty local cache". Then the objects in the world will be deleted (and also the cache files on your computer for this world ) , and after that the objects start to load again, creating at the same time a new "cache" for this world. We call this procedure also "bouncing". This method is useful when some objects in the world are not loading like they should. |
| F7 - Webpage window : |
| The F7 key will open a webpage window, and will show you the most recent webpage link . We mean with this : if you teleport another world, where there isn't any homepage for this world, then you will see the homepage of the previous world you have visited. |
| F8 -
Whisper mode : |
| By pressing F8 there will appear or disappear an extra whisper chat line,
where you can whisper things to another chatter, without that the other chatters can read what you have whispered. The text which you have typed appears in blue colour in the chat
window. |
| F9 - Tabsheet window |
| By pressing F9 the tabsheet window will appear or disappear, and these are the tabsheets : |
| Worlds : world list with the number of chatters in those worlds. Double clicking upon a world name will teleport you to that world. |
| Teleports : shows a list of stored teleports, and you can add new ones with the menu choice : teleport - remember |
| Telegrams : shows all the telegrams which you have sent to or have received from other citizens. |
| Contacts : shows a list of all the contact persons you have added, by right-clicking you can add new contacts |
| Voice chat : in those worlds which have the voice chat function, you will be able to talk with the microphone of you computer. |
| User guide : is the same guide which appears if you press the F1-key |
| F10 - Grid lines : |
| By pressing F10 you will see the grid lines of the cells, if you press again F10 then you will see the grid lines through the objects, if you press a 3rd time F10 then you will have again a normal view. Every grid square represents 1 cell whcih is 10mx10m in size. The grid lines are useful when you are building. In most of the worlds, the grid lines indicate the size of the world (where the grid lines stop), you can't build outside that area. (One exception is if you use models of which the axis is located outside the object itself). |
| F12 - Interrupt a mover (detach mover) |
| if you are navigating with a mover, then you can interrupt the navigation by pressing F12. In most cases, the movers are cars, boats, trains, space vessels, ..., or they are pickup objects e.g. a sword, a key, an apple. |
| CTRL+F1 : Commands bar : |
| Makes appear/disappear the commands bar (=the menu) at the top of your screen , it is important to see the commands line , sometimes it is useful to press CTRL+F1 , in order to have a larger screen . |
| CTRL+F2 : Toolbar : |
| Makes appear/disappear the toolbar (=Icons bar) at the top of your screen. |
| CTRL+F3 : Gestures menu : |
| Makes appear/disappear the gestures menu (= a list with the avatar sequences which you can apply upon your avatar : jump, dance, wave ,...) |
| CTRL+F4 : Chat window : |
| Makes appear/disappear the chat window. |
| CTRL+F5 : Status bar : |
| Makes appear/disappear the status bar (= the bottom line of the screen) |
| CTRL+F6 : Custom avatar window : |
| Makes appear/disappear the custom avatar window |
| CTRL+F7 : Credit info : |
| Makes appear/disappear the number of credits your have (hudscreen left at the top ) |
| CTRL+F11 : Avatar position : |
| Makes appear/disappear the indication of the position of your avatar (at the top of the screen) |
| ALT+F4 : |
| will close down the current Activeworlds session immediately |
| CTRL+left-mouseclick : Laserpen : |
| Makes appear/disappear the laserpen (for world owners only) |
| 11. Toolbar (icons bar) |
 |
Will show the tabsheet window (=same as using F9) |
 |
Teleport buttons : the house represents the home teleport (in the menu, you can setup your own home teleport). The arrows will teleport you back or forward , if you have already teleported during this 3dchat session. |
 |
Look up / look forward / look down (= same as using pgup and pgdn ) |
 |
Brings your avatar into another camera position (= same as pressing the END and/or HOME key) |
 |
Freelook mode : move the camera around by using the mouse , you can end this by pressing ESC or F2. |
 |
Away-from-keyboard button. The build mode-button will open the object properties window. |
 |
The t-shirt icon will open the CAV-window , to make your custom avatar. ( = same as CTRL + F6). The balloon icon wil open the voice chat tabsheet ( = same as using F9) |
 |
With the camera-icon you can make screenshot pictures. The map icon will open the presentation window. The car icon is used to detach movers, which means to end navigating with a mover or wearing/holding a mover ( = same as F12) |
 |
The internet-explorer icon will show the last active webpage during this 3dchat session ( = same as using F7). The questionmark icon will show the AW version and your citizennumber. |
 |
The gestures menu shows a list of sequence moves that you can apply upon your avatar. The sequence files are stored in a seperate map on the object path of the world. The menu of sequences is different in every world, depending on the setup menu made by the world owner.
|
| 12. Overview of the menu (commands bar) |
| Teleport - To / Teleport - Back |
| Here you can teleport to another world and / or to another position in this/that world : 15S 0E 5a 300 |
| Apart from the S-E-N-W position, you can add the altitude and the direction in which the avatar has to look |
| Teleport - Make this my home |
| The actual position and world will be the home teleport : if you click upon the house icon of the tools bar , you will be teleported each time to this place. |
| Teleport - Remember |
| Each interesting place can be stored this way, and will be add to the teleports list in your F9 tabscreen. You can modify the teleport description and add a name to this stored teleport. |
| Teleport - Remember location on Exit |
Each time when you close down the Activeworlds session, you will reenter Activeworls at the universe entry point, unless you choose "Remember location on exit". This location will stored each time into the aw.ini file when you close down the AW session. You can undo this again , by deleted this again in the ini file. |
| View - Look up/down/level ** View First Person/ Overhead /.... |
| You can also use these menu options to change the camera view of your avatar |
| Options - Settings - Performance |
| In order to have a good framerate you can desactivate or decrease some of these options : avatar animation, avatar shadow, mirrors, etc. |
| Options - Settings - General |
| Here you can choose if you want some of these options : hear sounds, head bob , icon size, world rating, ...etc |
| Options - Settings - Audio |
| Here you can choose the volume for several types of sounds, and streaming media. |
| Options - Settings - Downloads |
| Here you can choose for URLs for pictures and audio if you want to allow this or not, or if you want a limitation of the size of it. |
| Options - Settings - Chat |
| Here you can choose if you want chat balloons, chat log, avatar rendering and voice chat options, ...etc. |
| Options - Settings - Advanced |
| Here you can choose another language for your menu, a spelling dictionary, or if you want to see error message ,...etc |
| Options - Settings - Web |
| Here you can choose between an embedded or external web browser |
| Options - Settings - Cache |
| Here you can do the cache management (=determine how much cache you want to store on your computer) |
| Options - Settings - Graphics |
| Here you can choose the graphics mode (e.g. direct3D) , or choose if you want to see the world in wireframe |
| Options - Settings - Addons |
| This is a media streaming option. |
| Options - Citizen |
| Here you can change your citizens password , the privilege password, view your bot limit, your shop history, your immigration day , your time online |
| Options - Configure Controls |
| Here you can modify the function keys, this can be used in case you are using a laptop or game console |
| Options - World - Features |
| As a world owner, you can set up all the world options for your world (sound, lighting, voice chat, visibility, water textures, cloud textures, skybox, ground , reflections, enable or disable flying, pass-through, object selection...etc.). |
| Options - World - Rights |
| As a world owner, you can determine here who is allowed to enter the world, who can build, who gets bold text, who has bot rights , ...etc. |
| Options - World - Ejections |
| As a world owner, you can determine here who is not allowed to enter the world (during a certain period) |
| Show - Toolbar / Downloads / Chat / Gestures / Status Bar / Credits / Web / Whisper / Tabs / Cell Grid / Position |
| These options con also be obtained using the function keys. |
| Show - Classic Bars |
| If you desactive the classic bars, you will see the toolbar (icons) at the bottom of your screen. And you can choose for "continuous" avatar gestures. |
| Login - Citizen |
| Here you can log in as a citizen, or as another citizen , and you can choose to have your password stored. |
| Login - Privileges |
| Here you need to have the privileges password of another citizen , in this case you will be able to build/host a world etc. under the name of that citizen |
| Avatar - Custom avatar / .... |
| Here you can choose between the custom avatar or one of the many other avatars in this menu list. |
| Visiblity - Float / 30 metres ..... |
| Here you can modify the visibility , depending on the world you are in, you can also increase visibility up to 500 meters by changing the.ini-file settings |
| Tools - Presentation |
| If this option is activated in your world, you can make website presentations from your computer upon a pictwll object |
| Help - User Guide |
| Will show the user guide in the F9 tabs window |
| Help - Help with Help |
| With link to the help webpages of Activeworlds https://www.activeworlds.com/help/aw60/index.html |
| Help - Registration |
| This is outdated as citizenship is free since june 2013. Now use the "orange ball" -icon on the toolbar to register and buy credits for a world or for a bot. |
| Help - About |
| Shows the current Activeworld version and your citizen number. |
| |
|
|