
 |
 |
 |
 |
 |
 |
 |
 |
 |
|
|
|
|||||||||||||||||||||||
Start to build : copy & rename objects One of the most exciting things in Activeworlds is the abililty to build your own things. It doesn't matter if it's simple or advanced and complicated. But sometime, somehow and somewhere you need to learn how to build. The best place for this is the world AWSchool, where you have a team of teachers to help you. Here you can read how to start building and use some basic building commands When you arrive in AWSchool, you will arrive on a square where you will see a list of teachers, and also signs with teaching areas . Press upon one of the signs of the teaching areas and you will be teleported to such an area.. If you are lucky, one of the teachers can assist you with learning to build. Otherwise you can try to do it on your own, this webpage here might help you too ... |
 |
||||||||||||||||||||||
Each of these teaching areas has the same presentation and the areas are used for building exercises for everyone. But the builds are regularly deleted , in order to make again new free building space for other new builders. On this teaching area ,you will see a picture of a keyboard showing which keys you need to use for building. In most of the building worlds, and also in the world AWSchool , there is a building bot. This bot controls and makes it impossible to build where another citizen (builder) has built something already. If you do try to build where someone else has built ,then you will get the bot message in your chat window :: Building Inspector: You are not allowed to encroach into another's property |
 |
||||||||||||||||||||||
In the teaching area, the grass is free building area, and the street with the sign objects is occupied area . A bit further , you will also find a rectangular object, and now you will make your first object, just by copying this rectangular object. Build your first object (=copy an object) Put your avatar in front of the rectangular object , or you can move also at the other side of the object, which is even easier, because then your copied object is immediately on a free building space. In this tutorial , there is 1 extra step to explain how to move your object to that free space.We will start with step 1 :
Step 1. Move your mouse cursor above the rectangular object and right-click with your mouse. Now you will see that the object will be surrounded by yellow lines:= the object is selected . You will also see a window with the object properties. The yellow lines of the object and the window with the object properties indicate that the Building mode is active. If you close the object properties window , or if you click with you mouse around the object , then the building mode is desactivated again. If you right-click upon another object, then you remain in the building mode, but then you need to select the rectangular object again. It is possible that this object properties window appears in front of the object : then select the title of this object properties window with your left mouse key and move this window to another location of your screen, so that you will see the selected object again. |
The object properties shows the name of the model : wall031 and a lot of other information which we will explain later.
|
||||||||||||||||||||||
In any case : we remain in the building mode : redo step 1 in order to be sure that the rectangular object is selected. Step 2 : Press the insert-key (INS) on your keyboard. Now you will see that you have made a copy of the original object . The original object has no yellow lines anymore, but it is now the copied object that has the yellow lines : the new object is selected now. The building mode must remain active , because the new object is located on the property of another builder. If you would close the object properties or if you would deselect the object by clicking left-clicking with your mouse , then you will have to restart all over again. (building inspector message). |
 |
||||||||||||||||||||||
Step 3 : The new object remains selected. Now we will move this new object just by pressing the arrow keys of your keyboard , and we move this object into the free building area, which is here the green area for the teaching areas . It is easier if your avatar is in front of the rectangular object. If the avatar is located too much at the side of the object , then the arrow keys will bring the object to the left or to the right. In this case you will need to use the left or right arrow keys to move your object forward or backwards. In fact, you can choose yourself if you put your avatar in front or besides the object, but in any case, you must move the object towards and into the free building area. Otherwise you will have to restart all over again. |
 |
||||||||||||||||||||||
Step 4 : When the new object is totally moved into the free building area, then you can deselect the object , by either close the object properties window, or by left-clicking with your mouse somewhere in the 3d world : the yellow grid lines of the object will be disapparead and you have now your first object. If you select this new object again and you look at the object properties, then you will see below in this window that you are the owner of this object (citizen number + name).
|
 |
||||||||||||||||||||||
Do it yourself learn-to-build area There is also Do It Yourself area, when clicking upon this sign in the AWSchool landing zone, you will be teleported to 1N 22E. Here you can learn on you own how to build a house : by clicking upon the black signs with "start demo", you can see how you must proceed. There are also DIY areas in other languages. In the world AWNewbie you can also find teaching areas and the DIY area. |
 |
||||||||||||||||||||||
Build/add objects(=rename an object) Now that you have you first object, you can start building other objects, and this is quite easy. After copying the object, y ou just need to right-click upon the new object, and the object properties window will open. In this window you will see the model name : wall031.rwx You just need to modify or retype the model name into another existing model name: eg.:.
About existing models : There are thousands of objects to choose from. You can find all objects in the AWSchool object yard. In the AWSchool landing zone, you will find a teleport to the AWSchool object yard (position 34S 41W), but you will also find teleports to other object yards, also including the standard objects, and these object yards are used in other worlds. When building new objects in AWSchool, the buildbot requires the .rwx-extension. In other worlds you can build new objects, without needing to type the rwx extension. |
|
||||||||||||||||||||||
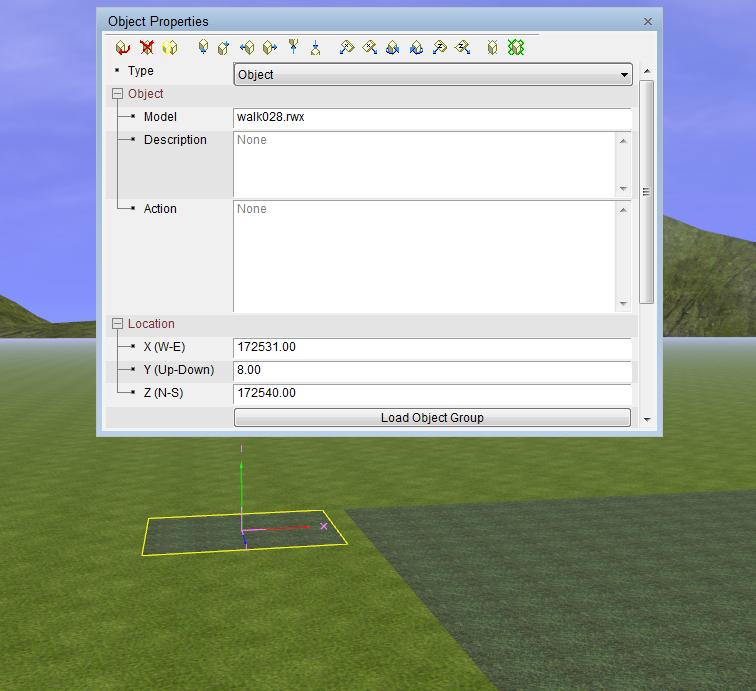
Find free land Once you have learned the basic building in AWSchool, you can start to search for free land. There you can continue with the building skills and learn new commnands. As you will have noticed in AWSchool , it is not possible to build on land that is occupied by another builder (except for those worlds with world settings which allow this). You can only build on unoccupied land. There are several public building worlds, where you can build for free : Alphaworld, Winter , Yellow, Mars, Cofmeta , Atlantis, WildAW,... . But you will not find any free land immediatelty : every cell has been taken already, because these worlds exist already for 20 years. But Alphaworlds for instance, is a huge world : it's a p32750 which means : 32750 cells into each direction from the central area. Now find free land by teleporting to an area of which you think that will still be free. Go to the menu and choose : Teleport > To > and now type the coordinates of your choice , for instance 12750N 12750W. Then you will be teleported to that area. Here you will probably find other building areas too . Now start flying around until you find an area that is still unoccupied. Go to the border, because as you have learned , you need to copy from an existing object. Now copy an object of the building "border line" , by pressing the Insert key and move this object completely to the free land. In most of the cases you will succeed , except if people have been building in the sky or underground, so check that too. In the example here, we copied the object walk028.rwx. This is a land piece object , and is useful for covering land. Now start to copy this land piece and create your building area, until it is big enough for you to build upon. Don't leave any gaps between the land pieces, because otherwise other builders can build in between. Read the other tutorials (e.g. 17. aligned building) where you will learn that a lot of land piece models match perfectly the cell grid (which is useful for building) , and which will make it a lot easier to cover your land. |
 |
||||||||||||||||||||||
 |
||||||


